
Gameplay
0. PRESENTATION
Romancing SaGa 2 has a unique concept and gameplay:
- You direct generations of rulers of an Empire oven the span of up to several millenia! Your goal is to gain support and lands in order to face Seven Heroes of old.
- Beside the very beginning and the very end of the adventure, your characters will change all the time - there is no 'main character' or 'main cast' - and the game is non-linear (you can do most quests in any order provided you can access them, be it in space or time).
- There are more than 30 character classes to get allies from, and from whom you can learn new party formations, to battle more than 270 different enemies which you can't possibly all see in a single regular playthrough.
- Through battles, your characters will get stronger and better at the weapons or magics they use, within each generation and as generations pass, through a system of individual and collective experience for your party and a system of imperial reincarnation.
- While new spells are created thanks to battle experience and expensive research, new techs are devised in the heat of battle, a spark and sudden inspiration born from fierce fight against strong enemies.
- In the capital of the Empire, beside advanced spells you can also research new equipment and expand the town. All this costs money (Crowns) which is gained after each battle depending on the size of your Empire and the quests you have completed, and found in chests in the dungeons you explore.
- Enemy item drops are very rare. Mindless grinding in order to get them (or to get artificially stronger, for that matter) is not recommended, as enemies will become very strong fast.
- All of this means a unique gaming experience and a great replay value!
Let us have a closer look at the game architecture:
There are 3 modes in RS2:
- World Map(s), where you may select a place to go to among the:
- Action-Movement Area Maps, which can be friendly (towns) or hostile (dungeons) with enemies that attack you and trigger:
- Battles, turn-based.
1. WORLD MAP & REGIONAL MAPS


1.1. WORLD MAP
The World Map is divided between Imperial territories, which you can freely access, and the rest, greyed out. It is a division akin to the known vs. unknown world: starting with North Varennes, where your home base Avalon is, you will have to travel to new regions and try to get them to join you (control of them, annex them). RS2 is (also) about world conquest!
1.2. REGIONAL MAPS
You can access Regional Maps whether they are Imperial territories or not:
- freely from the World Map if they are,
- by other means (mainly land/sea travel from other Regions) if they are not.
From the Regional Maps you can access specific locations, most of which must be opened/unlocked first: the Action Area Maps.
2. ACTION-MOVEMENT AREA MAPS

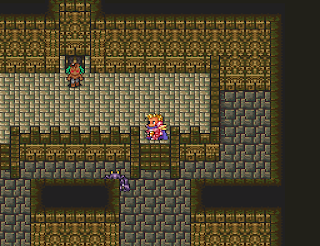
Local Action-Movement Maps can be friendly (towns) or hostile (dungeons), and that may change during the course of your adventure. In these maps, your Emperor's icon represents your party, and you can move about the map and explore.
2.1. SELECT MENU
In these maps, you can also access the Select Menu (so called because on SFC it is accessed by pressing the Select Button).

It displays your location, your pocket money, and from there on you can manage all aspects of your party:
- check your Character's Attributes (能力値 Stats)
- and the Item Inventory (持ち物),
- manage your party members' Equipment (装備),
- Spells (術),
- Skills (技 Techs),
- and your Battle Formation (戦闘陣形),
- change the Game Settings (環境設定), especially the default Walk or Dash,
- or Save your game (セーブ).
In Remaster Edition, you can additionally check the Imperial Log (lower-left corner button), which records the steps of your adventure.
Let us see the detail of your characters' stats first.
2.2. CHARACTERS STATS
Most character stats can be readily accessed in the Select Menu > Attributes > (Character).
There are also a few hidden variables.
Note (SFC only): From a Character's Attribute screen you can also have direct access to that Character's Equipment, Spells and Techs. Convenient!
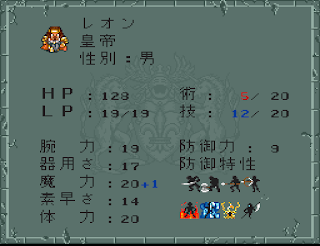
2.2.1. Attributes / Ability Stats
・Class: Does not really do anything, as characters are coded individually. Nevertheless, characters from a same Class share some similar traits (beside their appearance), like their Race, or the flags that allow you to use the Windmaker or to subdue the Armed Merchants' guard. See the Characters section for details.
Gender (Male/Female/Unknown): Some quests and some tech effects are gender-dependent.
・HP (Health Points, max=999): If HP=0, the character goes down and loses 1 LP. If HP=0, each subsequent attack = -1LP. Affects one tech, and the difficulty of some boss battles. Depends on BC and STA: see the Advanced section for Initial HP and HP Gain. Fully recovered after every battle. During battle, can be restored by Techs, Spells, battle-usable Items or can regenerate thanks to specific equipment and adequate magic environment. See the Healing section.
・LP (Life Points): If LP=0, permanent death (i.e. the character disappears from your party, but can be recruited again in this generation or another when their turn comes again in the recruitment cycle: see also the Characters section). MaxLP is static. A few rare usable items allow partial recovery, one accessory full recovery when sleeping.
・SP (Skill Points, 技(WP) Waza Points, max=250): Consumed to use Skills (Techs/Waza). Recovery: sleep, inventory-usable Items.
MaxSP = Highest SkillLV x2 + Sum of all SkillLVs.
・MP (Magic Points, 術(JP) Jutsu Points, max=250): Consumed to use Magic Spells (Jutsu). Recovery: sleep, inventory-usable Items.
MaxMP = Highest MagicLV x2 + Sum of all MagicLVs + 5.
Note that maxMP won't be accurate right after learning new magics: battle once and stay at an inn to correct.
Numbers in black are at max value. In blue, not! And in red, ≤ n/4.
・STR (腕力 Strength): Affects Sword, Gsword, Axe, Club, Spear, Martial dmg & accuracy.
・DEX (器用さ Dexterity, Agility): Affects Short Sword & Bow dmg & accuracy.
・MAG (魔力 Magic Power, Intelligence): Affects spell power, and dmg for few techs.
・SPD (素早さ, Speed): Affects turn order in battle, evasion rate, Martial dmg, accuracy for Sword, Gsword, Axe & Club.
・STA (体力 Stamina, Constitution): Affects MaxHP (inital + raise).
Ability Stat Raw Max = 25.
These are all important fixed stats that can only be altered slightly by equipment (displayed as '+n' next to the attribute value, in blue on SFC, in black in the Remaster Edition).
・DEF (防御力 Defense): Displays your Slash Def only (from your equipped items).
・The Defensive Traits (防御特性) display visually (icons) the attacks against which you have some defense (Slash, Blunt, Stab, Shot / Heat, Cold, Bolt, Status). This depend solely on your equipped items. See the Items section for the hidden exact values.
・Logic (理力, LOG): Hidden parameter on SFC. Remaster: can be measured in the Magic Research Center. Affects spell power, positively for Dark Magic, negatively for all other offensive spells.

・Weight (重さ): The sum of the weight of your character's equipment. See the Items section. Affects turn order, tech accuracy, dmg of a few techs. A hidden parameter on SFC. Remaster Edition: can be measured in the Warehouse (Avalon Castle, 2F).


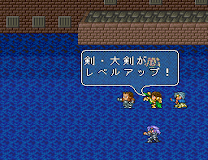
2.2.2. Weapon & Magic Skills Levels

The Weapon & Magic LVs are visible in the right-hand column of the Select Menu in the Attribute, Equipment, Spells or Skills screens.
Affect SP and MP, and in general the relevant techs dmg & accuracy and spell pwr.
See the Techs section and Magic section for details.
Max LV = 50.


・Sword/Greatsword LV (剣・大剣, SW LV) - affects Sword, Greatsword & Claw dmg & accuracy.
・Spear/Short Sword LV (槍・小剣, SP LV) - affects Spear & Short Sword dmg & accuracy.
・Axe/Club LV (斧・棍棒, AX LV) - affects Axe & Mace dmg & accuracy.
・Bow LV (弓, BOW LV) - affects Bow techs dmg & accuracy.
・Martial Arts LV (体術, MA LV) - affects Martial Arts techs dmg & accuracy.
For Fusion Spells, both LVs are taken into consideration. See the Spell Dmg section for details.


・Pyrology LV (火 Fire, PY LV) - affects PY spell pwr.
・Hydrology LV (水 Water, HY LV) - affects HY spell pwr.
・Terrology LV (地 Earth, TE LV) - affects TE spell pwr.
・Aerology LV (風 Wind, AE LV) - affects AE spell pwr.
・Cosmology LV (天 Heavenly, Divine, Light, COS LV) - affects COS spell pwr.
・Umbrology LV (冥 Dark, UM LV) - affects UM spell pwr.
Note that one character can only have one of Fire or Water, Earth or Wind, Light or Dark.
Your characters' starting LVs upon joining depend on their innate weapon/magic bonuses or penalties (see the Characters section) and your current Master Levels (MLVs: see the next section), and they go up when enough Technical Points (TP) earned in battle (see the HP, LV & MLV Gain section for details).
Besides these individual stats, there are also important Kingdom / Party variables, some hidden.
2.3. KINGDOM / PARTY STATS
2.3.1. Revenue and Treasury


The two officers in the small room left of your throne (Avalon Castle 2F) are in charge of the Empire's finances. One tells you how much there is in the Empire's Treasury (Remaster: top-right NPC), while the other keeps track of the Empire's Revenue (Remaster: bottom-left NPC).
The Imperial Treasury (max = 16,777,215) is where your money goes and piles up when you have more than 10k of pocket money.
Note that you can fill you pocket money at any time by talking to the Treasury Officer.
The Imperial Revenue is your Crown income per battle engaged (be they won, lost or fled).
It starts at 4000G, will increase as you complete certain quests and annex territories, and can go up to 31,600G (Remaster: 44,400G).
See the Money Management section for details.
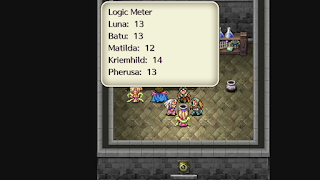
2.3.2. Master Levels (MLV)
Your characters all have visible, individual Weapon and Magic Skill LVs but in all these categories there are also invisible Master Levels (MLVs, also called Global Levels, max=40) that can only be deduced (after a reincarnation, or when a character joins the party).
Every time a weapon or a spell is used in battle and the battle is won, not only each character still standing at the end of the battle gains Technical Points (TP) individually that are added to the TP total of the corresponding Skill LVs (e.g. if a character used a Sword tech and a Pyrology spell in the battle and you gained 500 TP at the end of the battle, this character's Sword LV and Pyrology LV will get approx. +250 TP each), but each party member's Skill-related action count will also add the full Tech Point amount to the correponding hidden Master LVs (e.g. if in all two characters have used Sword attacks, two have used Bows, one has used their Short Sword, one has used Hydrology, two have used Aerology, before defeating the enemies and winning 500 TP, then Sword MLV +1000, Bow MLV +1000, Spear/Short Sword LV +500, Hydrology LV +500, Aerology LV +1000)(approximately, see the Victory section for details).
These MLVs are an important factor for the starting LVs of your various characters when they join (or when your Emperor reincarnates). See the Characters section for details.
Specific Magic MLVs are also required to unlock higher spells. See the Magic section.
It may thus be efficient to try to maximize TP gain for MLVs, by making each character use as many different weapons or magics as possible, especially during battles with enemies with a high TP worth (likes bosses, or endgame regular enemies). E.g. if all 5 characters used Cosmology during a battle, the Cosmology MLV will be credited the battle TP gain x5.
Note that each character only needs to use a Weapon or a Magic once for the corresponding LV & MLV to be eligible fo TP gain, and there is no bonus whatsoever in that regard for using one Weapon several times.
2.3.3. Battle Counters
Beside MLVs, there are other variables that influence your Party, chiefly your Battle Count.
The Battle Count (BC) is your total number of battles engaged (be they won, lost, or fled).
It affects:
- the characters' initial HP
- the regular enemies' rank
- some enemies' pattern list (stronger techs if BC is high)
- the Last Boss' number of actions per turn (between 2 and 2+(BC/500), max 7).
A hidden stat on SFC, readily available in the Remaster (Avalon 2F, S-E-most NPC).
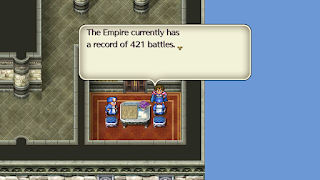
There is also a Generational Battle Count (GBC), which is the number of battle engaged during the current generation (max=255), that affects the Generation Skip occurrence and values (see the Time Jump/Reincarnation section for details) and the advance of the Avalon Termite Invasion.
Remaster: Early battles in the Maze of Memory do not count towards your BC.
2.4. ITEM STATS


There are a few readily visible variables:
Weapon ATK - Affects the dmg of most techs.
Weapon Weight - Affects turn order, dmg of a few techs, accuracy for Sword, Gsword, Mace, Axe, Spear. Hidden parameter on SFC (Remaster: indirectly visible thanks to the weighing scale in the Warehouse).
Defense equipments display only one deceptive DEF value (and in the Remaster indirectly their Weight, which influences effective combat SPD, some techs dmg, and turn order), coupled with very limited descriptions of additional effects when in the Inventory or the Warehouse (to which the official translation unfortunately adds confusion and errors).
But tech and defense attributes are in fact a-plenty and there are many additional effects and possible Status immunities: all of this, hidden!
2.4.1. Item Attributes
There are 8 different atk/def attributes and all defense items have in fact 8 corresponding values.
| Type | Attribute |
|---|---|
| Physical | Slash (SL) |
| Blunt (BL, Hit) | |
| Stab (ST, Pierce) | |
| Shot (SH) | |
| Magic | Heat (HE) |
| Cold (CO) | |
| Bolt (BO) | |
| Status (STS) | |
| None | None |
Notes:
- Your characters have no innate Def value attached to them: all defense variables come from your equipped items. The value displayed in game is the def against SL attacks only, which can be very misleading.
- Techs and spells usually deal damage of one kind of attribute, but some have several. In that case, both attributes may trigger shield activation, and the target's lower def value is the relevant variable for damage calculation.
- If the total def for an attribute reaches 128+, the target becomes immune to attacks of that attribute.
- A few attacks have no attribute: they by-pass the target's defenses (def=0).
- See the Tech section, the Magic section and the Items section for details.
There are two additional special elements, linked to specific attacks, against which the target is either susceptible or immune (and which are thus closer to Status flags):
- Air Pressure: a flag related only to the powerful Sword tech Airwave and Umbrology spell Dark Wash, which, if they hit, take away a portion of the target's HP. There are two items that provide immunity against those: Erudite Robe and Candy Ring. On the enemy's side, most bosses, for example, are immune to Pressure attacks.
- Horror: a flag related only to the Umbrology spell Horror that provokes Confusion LV3 if successful. This concerns monsters, as some whole races are immune to it. Concerning your characters (but monsters too), defense items with the Mind immunity ward against Confusion and thus Horror.
2.4.2. Item Status Immunities
In addition to these 8 attributes, another set of item parameters deals with Status Ailment immunities.
They correspond to the possible Status Ailments:
- Insta-death / Petrification
- Paralysis
- Sleep
- Dark / Blind
- Poison
- Stun
- Air Pressure (special)
- Horror (special)
For your characters, a few items can provide immunity against certain status ailments.
Somes enemies or types of enemies are immune against specific Status ailments. Most notoriably, all Seven Heroes are immune against all Status ailments.
See the Battle: Status Ailments section below and the Items section for details.
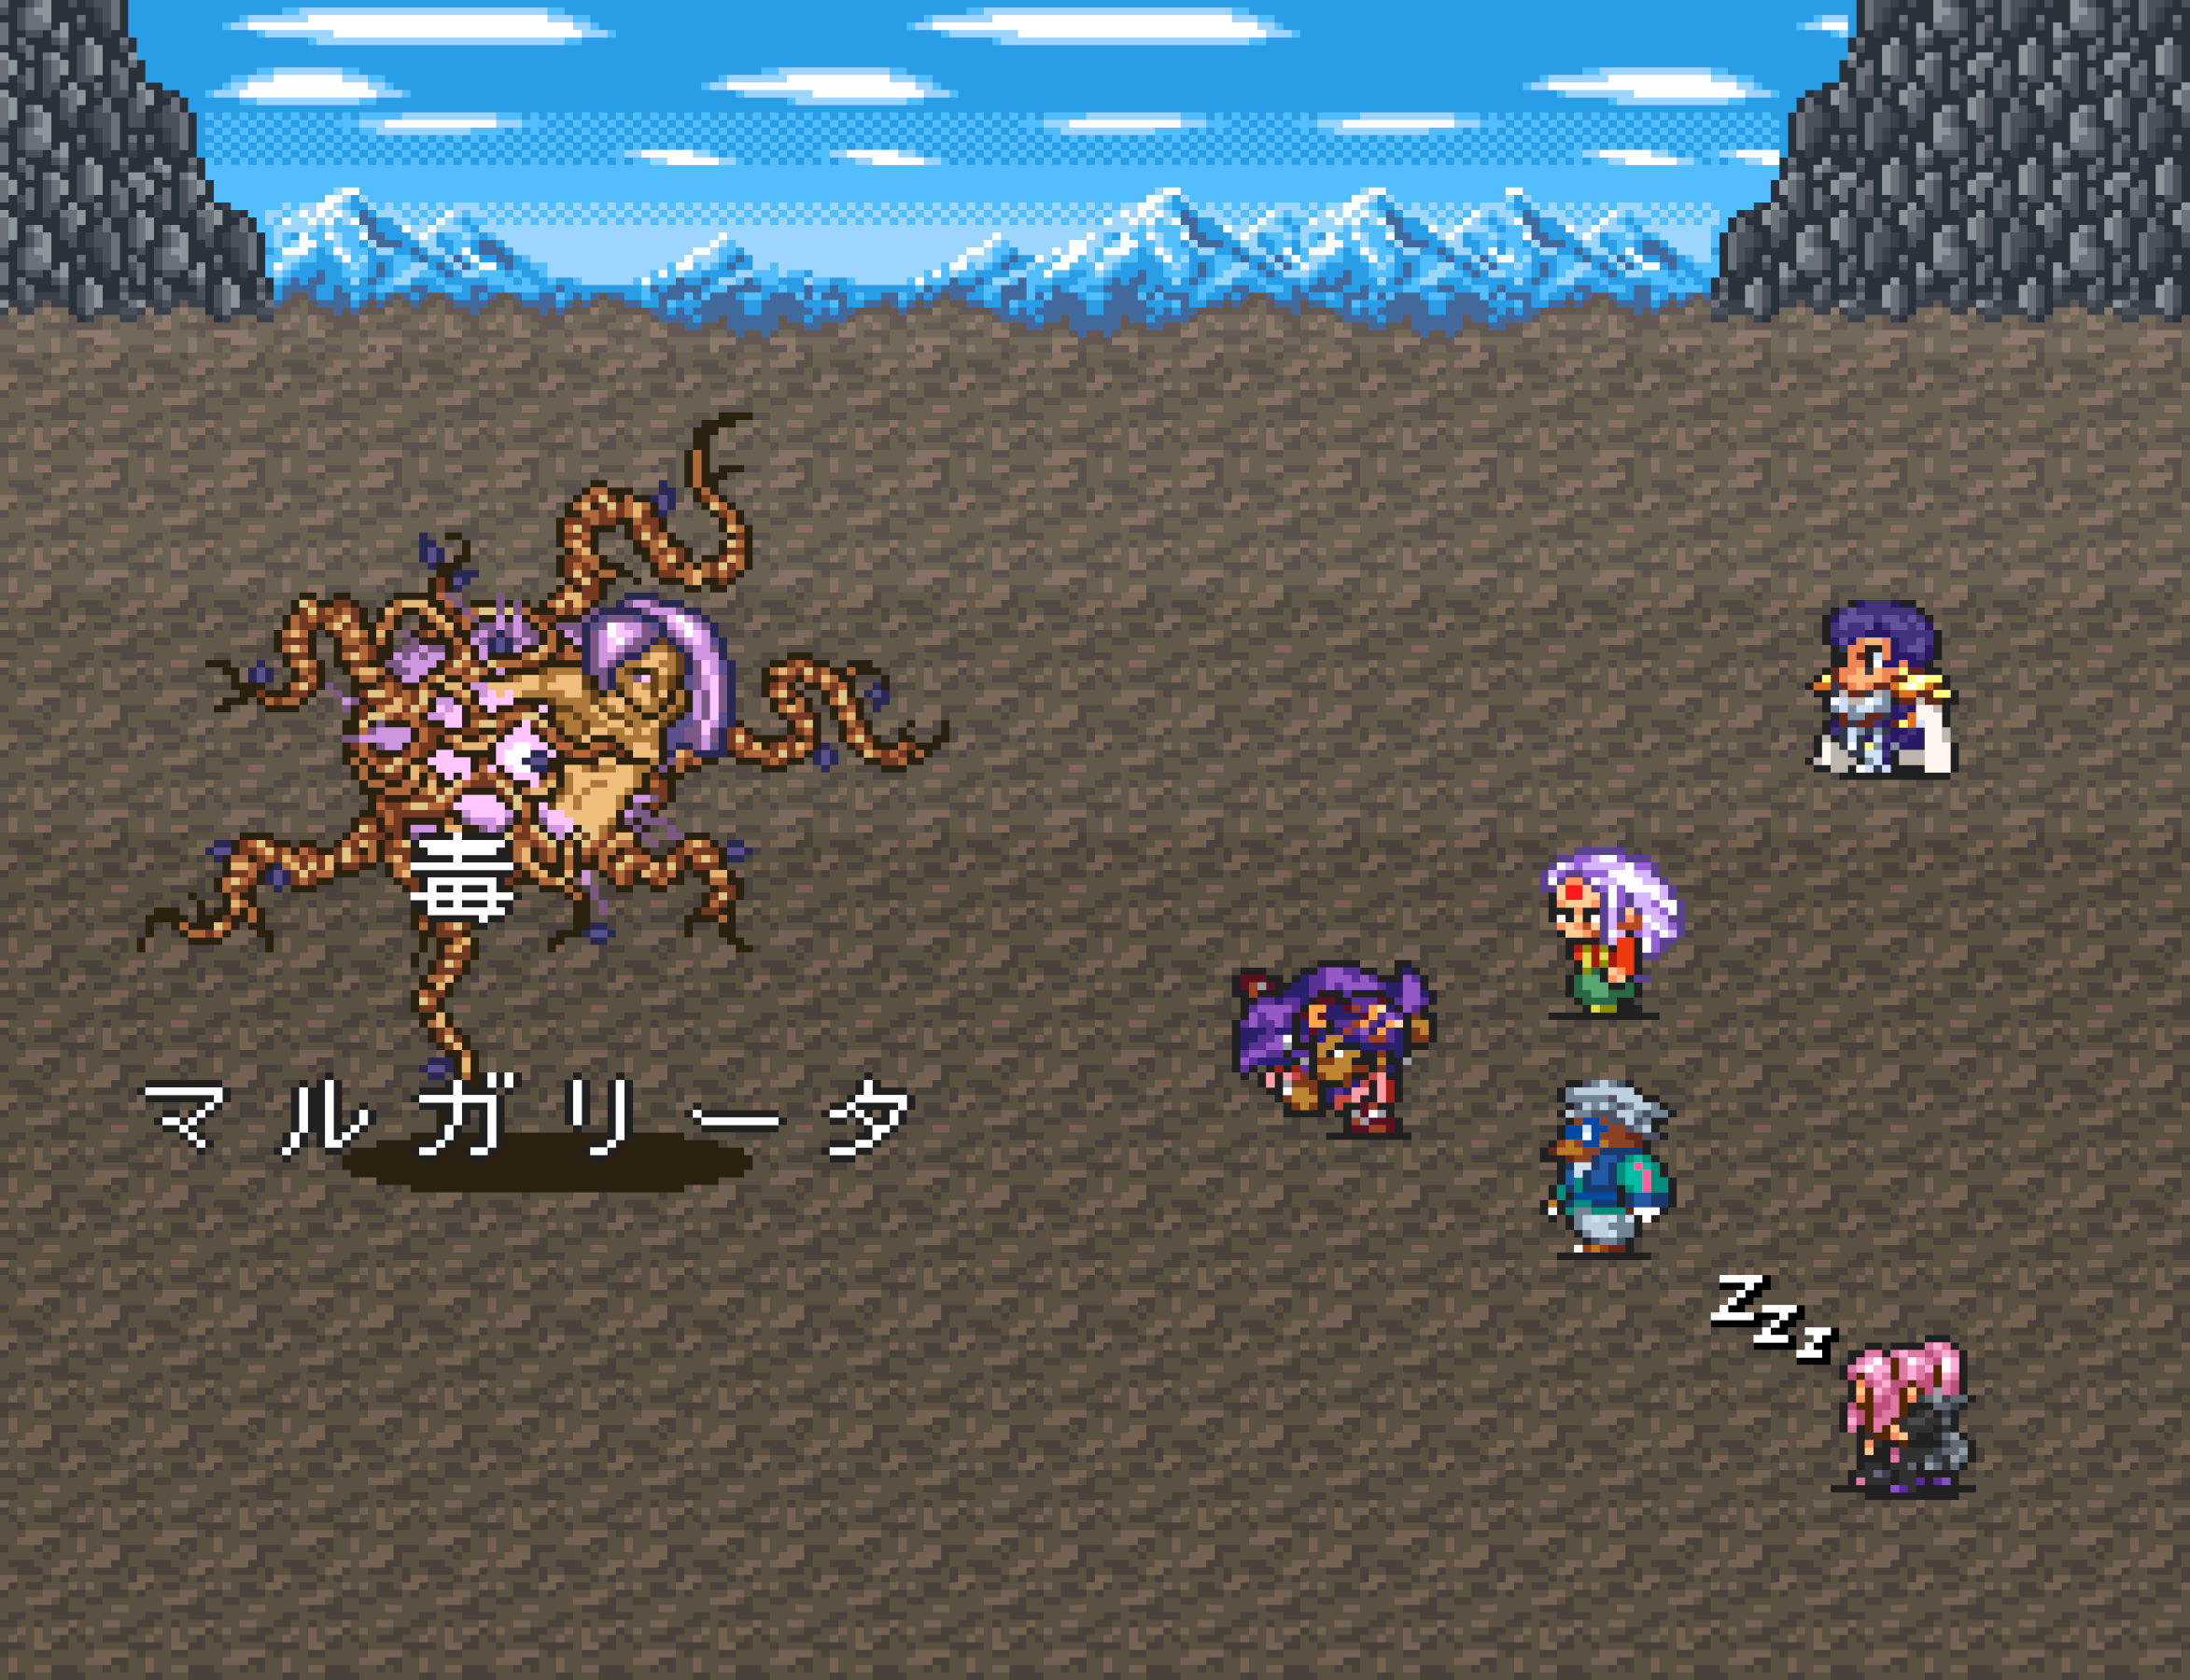
3. BATTLE
3.1. PREPARATION: PARTY & FORMATIONS
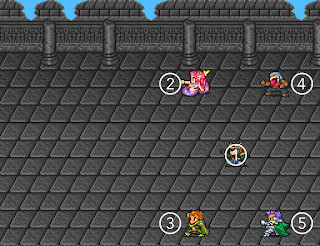
Your Party can hold at most 5 characters whom you can recruit among the classes you have at hand. Some classes are available from the start while most must be unlocked. See the Characters section for details. Just talk to an available characters and accept to have them join the party.
Note that you cannot make your recruits leave the party. This is quite unconvenient but it cannot be helped. The only way to change a party member is to LP-kill them on purpose. Or evidently if a Generation Skip occurs.
Reminder: each time a recruit joins the party you have to equip them with items, techs and spells. This can be quite tedious at length but it cannot be helped either. The Emperor inherits the techs and spells of their predecessor.
The last step to prepare for battle, after checking that all your characters are equipped with weapons, armors, techs and spells, is to choose a formation.
Formations come with various shapes, target priorities, bonuses and penalties.
They are a capital part of your arsenal.
The default formation is Free for All. It is also the formation for any party of 1 to 4 members, the formation your party reverts to when 'Broke formation!' occurs, or when there is a change among the party members.
Imperial Cross is the only other formation available from the start.
New formations are gained:
- by choosing characters of specific classes as your Emperor (see the Reincarnation section)
- and talking to the formation instructor (Avalon Castle 1F, top-right):
|
Imperial Arrow: Imperial Guard Rising Phoenix: Strategist Lightning Flash: Levante Guard Desert Fox: Desert Guard Amazon Raid: Amazon Hunter's Gambit: Hunter Whirlwind: Nomad |
Divine Wall: Crusader Seer's Focus: Diver Rapid Stream: Armed Merchant Mu Palisade: Saigo Clansman Dragon Stance: Brawler Free for All 2: Vagabond Goblin Offense [Re]: Memory Maze (Green) |
When you have a party of 5, your Battle Formation can be changed in the Select Menu.
The Emperor's position is fixed but the other characters can switch places.


Specific Atk & Def Formation Bonuses can be:
- Boosts melee attacks = SL BL ST attacks dmg + 25%
- Boosts bow attacks = SH attacks dmg + 25%
- Boosts spell power = STS attacks dmg + 25%
- Auto-defend until turn = Defensive stance (dmg/2) and Guard activation rate x2 until character acts.
- Auto-defend after turn = Defensive stance (dmg/2) after character has acted.
Note that the Formation SPD bonus or penalty is a corrective SPD value (FormSPDcorr) that influences effective combat SPD like so:
Combat SPD = SPD + [SPD/4] x FormSPDcorr - [ArmorWeight/2] + EquipmentSPDbonus
which means that the impact of the Formation SPD bonus or penalty is nothing to be overlooked.
Be careful: if even one character goes down, all the special traits of your formation are lost (back to Free for All settings) until all characters are back on their feet.
Several considerations could guide your choice of an adequate formation for your party:
- the number of heavily armored characters you have, and inversely the number of fragile characters in your party: formations offer a choice of a vanguard of 1∼4 characters with a high or higher probability to be targeted.
- the kind of techs the enemy uses (for bosses, mainly): if the enemy uses techs that can turn your characters against each other for instance, quick or first-strike formations are a must; or techs with vertical or horizontal areas of impact..
- your playstyle (offensive, defensive..) and preferences!
FREE FOR ALL フリーファイト
Default |
Target Chance | Bonuses & Penalties | Varia |

| 1∼5 = 20% |
- |
Default formation when party < 4 or when Back Attack'ed |
IMPERIAL ARROW インペリアルアロー
Imperial Guard |
Target Chance | Bonuses & Penalties | Varia |

|
1 = 4% 2 = 1% 3 = 81% 4 = 8% 5 = 6% |
1, 3∼5 = Def after turn |
The vanguard (3) is the target of most attacks. |
RISING PHOENIX 鳳天舞の陣
Strategist |
Target Chance | Bonuses & Penalties | Varia |
|
1 = 70% 2-3 = 10% 4-5 = 5% |
1 = Def before turn, Guard rate x2 after turn 2∼5 = SPD-1, Def after turn, SL BL ST dmg + 25% |
The Emperor is the target of most attacks. |
LIGHTNING FLASH 稲妻
Levante Guard |
Target Chance | Bonuses & Penalties | Varia |

| 1∼5 = 20% | - |
Fixed play order: 2, 3, 4, 5, 1. Turn order depends on 2. Cancels the special effects of techs with specific order priority. |
DESERT FOX デザートフォックス
Desert Guard |
Target Chance | Bonuses & Penalties | Varia |

|
1 = 50% 2-3= 20% 4-5 = 5% |
1 = SPD+1, Def after turn + Guard act x2 1∼3 = SL BL ST dmg + 25% | 1∼3 at the vanguard, with dmg bonus. |
AMAZON RAID アマゾンストライク
Amazon |
Target Chance | Bonuses & Penalties | Varia |

|
1 = 30% 2-3= 20% 4-5 = 15% |
1 = SPD+3 2-3 = SPD+1 1∼3 = SL BL ST dmg + 25%, Def after turn |
The most offensive formation. |
HUNTER'S GAMBIT ハンターシフト
Hunter |
Target Chance | Bonuses & Penalties | Varia |

|
1 = 2% 2-3= 29% 4-5 = 20% |
1 = SPD-2, Bow dmg +25% 2-3 = SPD+1, Def after turn |
Very protective of the Emperor. |
WHIRLWIND ワールウインド
Nomad |
Target Chance | Bonuses & Penalties | Varia |

|
2-3= 35% 1, 4-5 = 10% | 1∼3 = SPD+1, Def after turn |
2-3 at the vanguard |
DIVINE WALL ホーリーウォール
Crusader |
Target Chance | Bonuses & Penalties | Varia |

|
1 = 34% 2-3 = 32% 4-5 = 1% | - |
1∼3 at the vanguard. 4-5 very protected. |
SEER'S FOCUS パワーレイズ
Diver |
Target Chance | Bonuses & Penalties | Varia |

|
1 = 10% 2-3 = 20% 4-5 = 25% |
1 = SPD-2, STS dmg +25% 4-5 = SPD+1, Def after turn |
The only formation with STS dmg bonus. |
RAPID STREAM ラピッドストリーム
Armed Merchant |
Target Chance | Bonuses & Penalties | Varia |

| 1∼5 = 20% |
1∼5 = SPD-2, Stun after turn (Shields/Guards cannot activate). |
Party plays first. Fixed play order (1 to 5). |
MU PALISADE ムー・フェンス
Saigo Clansman |
Target Chance | Bonuses & Penalties | Varia |

| 1∼5 = 20% | 1∼5 = SPD-2, Def before turn. |
Party plays last. Fixed play order (1 to 5). The most defensive formation. |
DRAGON STANCE 龍陣
Brawler |
Target Chance | Bonuses & Penalties | Varia |

|
1, 5 = 28% 2-3 = 18% 4 = 8% | - |
Fixed play order (1 to 5). Turn order depends on 1. Cancels the special effects of techs with specific order priority. |
FREE FOR ALL 2 フリーファイト-1
Vagabond |
Target Chance | Bonuses & Penalties | Varia |

|
1 = 1% 2 = 24% 3∼5 = 25% |
1 = SPD-2, SL BL ST Bow dmg +25% 2∼5 = SPD+1, Def after turn. |
Very protective of the Emperor. |
GOBLIN OFFENSE ゴブリンアタック
- |
Target Chance | Bonuses & Penalties | Varia |
 |
1∼3 = 28% 4-5 = 8% |
1∼5 = SPD+1 1 = SL BL ST Bow dmg +25% 2-3 = SL BL ST dmg +25% 4-5 = Bow dmg +25% |
Remaster Only. Unlock: Maze of Memory (Green): Goblin Formation Scroll |
IMPERIAL CROSS インペリアルクロス
Default |
Target Chance | Bonuses & Penalties | Varia |

|
1 = 7% 2 = 3% 3 = 66% 4 = 13% 5 = 11% |
2 = SPD-2, Def before turn. 3 = SPD+1, Def after turn. |
3 is at the vanguard. |
Note: There are two additional formations that never made it in any version of the game: 急々如律令 ('May This Be Speedily According to the Law', an ancient China legal formula, picked up by Taoists and diviners as an incantation - Yin & Yang - most probably the Diviner's intended formation) and 機知縦横 ('Resourceful and Unrestricted': Flowing Formation? - Tactical Ranks - most probably the Ninja's intended formation).
And you must have noticed that monsters have formations too [JP].
3.2. ENCOUNTERS


Touching an enemy sprite triggers a Battle.
But there are several possibilities and you should be careful:
- A Back Attack occurs if you touch the enemy sprite while Dashing, or if an enemy touches you from behind, or if you have Dashing set by default (Remaster only): your formation 'breaks' = reverts to Free for All, and the enemy has an initiative bonus for one turn. Inversely, if you make contact with an enemy from behind (no dashing), your characters will get a First Strike and the enemy will lose their first turn.
- If you touch the enemy from the side ('Side Attack'), you get an initiative bonus. Same thing for the enemy which touches you from the side. Only Rapid Stream is unaffected by Side Attack.
Note that these are turn order corrections: it does not necessarily mean that one side plays first and the other side last (except for formations with imposed turn order depending on one character, like Lightning Flash). Every time someone for one side plays, the other side's turn order preference goes up.
You can always Flee from a battle (imperial prerogative), but for all intents and purposes it will be included in your Battle Count (Remaster: except partly in the Maze of Memory).
3.3. BATTLE MECHANICS
Battles are turn-based. At the beginning of each turn, you choose the actions your characters will perform.
You may act or attack in various ways, Defend (50% dmg reduction) or Flee (Emperor only).
3.3.1. Action Choice Phase


You can choose to use techs, spells or items.
You can only attack with the weapons you have previously equipped (Select Menu: Equipment) and can flip through the menu left and right.
There are Swords, Greatwords, Axes, Maces/Staves/Clubs, Short Swords, Spears and Bows.
Quite logically, Martial Arts (barehand) do not need to be equipped and can be used at any time.
The basic attack is the first line for each of your weapons (usually the weapon's name).
You can see all the available weapons in the Items section.
Most Techs (Skills) must be sparked/learned and equipped (Select Menu: Skills) in order to be usable. They consume SP upon activation.
Some weapons have built-in techs that need not be equipped and do not take a slot in the Skill Inventory Menu, but most must be sparked.
See the Tech section and the Weapon section.
Magic spells must be learned and equipped too. They consume MP.
See the Magic section for details.
Lastly, you can also use a few specific items in battle.
Like weapons and armor, usable items must be equipped in the Equip Menu before battle.
One item can only be used once, and it disappears when used.
See the Battle-Usable Items section.
3.3.2. Buffs & Debuffs
During battle, it is possible to boost your characters' stats and to lower your enemies', thanks to techs or spells. The enemies can also boost their stats and lower yours!
(De)buffs depend on your Skill/Magic LVs and are hence very weak at the beginning of your adventure, but by endgame they can be quite efficient, especially when coupled with item & formation bonuses, or other techs.
In RS2, once successfully applied, buffs & debuffs have full effect until the battle ends and they do not cumulate (for each stat the latest buff applies), with the exceptions of the peculiar Dragon Pulse & Deadly Drive.
See the (De)buff section for details.
3.3.3. Status Ailments
As we have seen in the Stats section, there are Status ailments parameters.
Techs or spells can alter the Status of the target (be it your characters or the enemy).
See theses Notes in the Techs section and Magic section for the list of the attacks which can inflict Status ailments.
Status ailments can turn around the flow of a battle, in your favor or disfavor. Stun and Confusion, particularly, can be very effective strategies against susceptible enemies. Enemies also widely use Status-affecting attacks, and forewarned is forearmed: it is possible to immunize yourself against some status ailments beforehand, not only through to Items immunities (CTRL+F the page for specific ailments), but also thanks to Evade Skills, which will allow you not to be hit by possibly disastrous attacks. And a simple Physic Water spell (which dispels most Status ailments) handy can be very helpful.
There are three additional Status alterations, to which there are no immunity flags: Petrification (= Insta-death for enemies), Invisible (mostly beneficial), induced in battle by tech or spell, and Float, the logical consequence of design peculiarities (Iris, all Winged and Ghost enemies, most Demon & Spirit, some Insect & Plant, Kzinssie, Wagnas).


| Status Ailment | Effect | Cure |
|---|---|---|
Insta-death |
Target is instantly down, knocked out, LP -1. | Restore HP (irreversible if LP=0) |
Petrify |
Character unable to take action for the rest of the battle. | - |
Paralysis |
Unable to take action, block or evade for several turns. | LV20+ Life Water, Physic Water, Elixir |
Sleep |
Unable to take action, block or evade for several turns, or until character is hit. | LV9+ Life Water, Physic Water, Elixir |
Blind |
Darkness: halves the Accuracy of Physical attacks. | Physic Water, Elixir, LV9+ Moonlight |
Mind |
Variants with different behavior patterns and durations: Confusion (may forget to act < randomly attacks: see Note 1 below) - Charmed (becomes an enemy) - Silence (unable to use techs or spells) | Physic Water, Elixir, LV20+ Earth Heal |
Poison |
Damage at the end of every turn. Dmg = (Max HP/8)+45 - STAx2 |
Physic Water, Elixir, Balm, Quality Balm |
Stun |
Unable to take action, block or evade for the rest of the turn. | Physic Water |
Invisible |
Immune to most physical attacks. Cannot be specifically targeted (be it by foes or friends). Effect of Lady Hawk axe built-in tech Feather Cloak, Hydrology spell Mist Cover and Last Boss' Astral Gate. | Take offensive action. Vortex spell. |
Float |
Immune to Ground (GR) attacks. | - |
Note on 'Mind' ailments


There are several degrees of Confusion (こんらん), signaled by the font color:
1) White: character actionable but may forget to act.
2) Green: character actionable but will randomly target friend or foe.
3) Red: character non-actionable and will randomly attack friend or foe.
The condition of a Confused character can get worse if hit several times with a Confuse Status attack.
There are also two other Mind attacks:
- When Charmed (pink hearts), the character turns into an enemy and will take antagonistic action (attack the party, heal the enemy).
- Silence (red 'こんらん/Confused' when hit; then Remaster Edition: 'Berserk') is also a Mind attack variant that prevents the target from using techs or spells.
Silence is also sometimes called Magic Stun or Berserk (from the Japanese 狂戦士, mad/crazed fighter); but it does not belong to the Stun category, and there is also a Martial tech called Berserk (which effect is not just Silence), hence 'Silence' for disambiguation; Madness (from 'Mad Biter') could have been a decent translation. Note that the Silence induced by Fire Dragon Flood cannot be avoided (Mind immunity does not work).
Slight benefit: the Silenced character is immune to further Mind attacks (except Astral Gate).
Exceptions and errors: You can still select and use: Balms (act as intended), Final Strike & Dancing Sword (become a regular attack), Shatter Staff (becomes a regular attack to ally #1, except by the Emperor), Staff Strike (becomes a regular attack to enemy #1).
Notes:
- If a character is Down or Petrified at the end of a battle, they won't earn any TP for this battle. A tough punishment, IMHO, so keep your party in shape!
- A character kneeling down (near-death) simply means that their current HP ≤ MaxHP/4.
- If you heal a character that was put asleep in the same turn, they act their turn as intended (as if nothing had happened).
- The Petrification of enemies may be similar to Insta-death but there are two interesting differences. The first one is that in battles during which the main enemy is accompanied by an infinite supply of monsters (Battle of the Gate / Stone), Petrified enemies cannot respawn. The second one is that, like for Life Blade, Petrified enemies do not drop items: if you want to farm a specific enemy/item, Petrifying the irrelevant enemies will increase your chances to get the item you want. Note that Petrify Rush can be sparked as early as Gerard (vs. Deep One or Pyrorex).
- Physic Water is the only way to recover from Stun. Recovering from Stun means that you can block/evade with shields again, for instance, but it is usually very difficult to plan when a character is going to get Stunned, and this only lasts one turn. Nevertheless, in the formation Rapid Stream, characters are systematically placed in a Stunned state after their turn, which can be remedied to by a Physic Water, precisely, if needed.
- A self-Suction when Charmed will only make your character recover HP. Which is nice.
- On screen, the effects are rendered as: Blind / Darkness (くらやみ 暗い): blackened eyes *** Sleep: Zzz *** Paralysis (まひ): yellow stars *** Charmed (誘惑): pink hearts *** Poison (毒): target turns violet-pink *** Petrified: target turns into a life-like statue (enemies: death) *** Confusion (こんらん): Confused + clouds above head (see the note on Mind ailments above) *** Silence: Allies: none (techs and spells greyed out) / Enemies: Berserk (red こんらん if Mad Biter / 狂戦士 if Martial Berserk) *** Stun (スタン) *** HP Regen (再生). It's mostly the same for enemies, with fewer visual indicators.


3.4. VICTORY!


When all enemies are defeated, the battle ends: it is time to reap the rewards!
There are up to 3 phases at this point:
・Phase 1 - Technical Points Attribution
Each enemy is worth a certain amount of Technical Points (TP), the sum of which is displayed at this point.
See the Monsters section for enemy TP worth.
・Phase 2 - TP Gain Calculation and Stat Level-Up Attribution
Related to Phase 1.
If a character is not down or petrified at the end of the battle, their HP LV and their eligible Weapon/Magic LVs (eligible if a corresponding tech or spell was selected to be used during battle) gain TP. The corresponding hidden Party Master LVs gain TP too, whatever the condition of each character may be (except Emperor's death or party wipe).
Individual LVs and MLVs gain TP differently:
- for individual LVs, the battle TP gain is divided by the number of Weapon/Magic categories used + some bonus (max 255 TP for each category) for each action selected (+1) and for each tech/spell actually used (+SP/MP used).
- for MLVs, each category used gains the total battle TP gain + identical bonus (max 255 TP).
Which means that it is better for the MLVs to spread your characters' actions across all weapons and magics (very and more important, in order to build a strong team later!), while it is better for the current characters' LVs to focus on one or two categories (arguably only relevant during your final generation, to make your final characters' strong points stronger - except if you are already planning for a NG+ on Remaster).
Note that for Fusion Spells, both magics get 50% of the regular TP gain.
If the TP earned is enough for a category to level up, it is displayed at this point.
See the Advanced section for the TP amounts necessary to level up and possible battle TP strategies.
・Phase 3 - Item Drop
Enemies have at most 2 specific items which may drop (some have one or none).
Only one item can drop per battle, but the drop rate is so low (2.3% or 2.7% for regular items, 0.8% or 1.2% for rare items, depending roughly on how many enemies there are and if a drop occurred previously) that even if there is one roll per enemy, an item drop remains a rare occurrence and should not be counted on (and grinding for items is not recommended unless you want enemies to become very strong quite quickly). On the other hand, this is one of the little things that wildly increases the replay value of the game: surprises are bound to happen! ; )
To see which enemies can drop specific items, see the Items section; to check if an enemy can drop items and what they are, see the Monsters section; and here is a list of the rarest droppable items.
4. GENERATION SKIP & REINCARNATION
One of the main originalities of Romancing Saga 2 is the dual mechanics of Generation Skip (or more properly Time Jump) and Reincarnation.
Your war against the Seven Heroes and your conquest of the continent spans over many centuries.
The continuity of your quest is assured by the Reincarnation Magic, passed down from Emperor Leon who learnt it from the Seer Orieve. It allows the strength of the previous Emperor to pass onto the next, factored, basically, by the characteristics of the next Emperor's Class.
Foreword Note: Reincarnation, Time Skip & Generations
It is easy to get confused and mix up reincarnation, time skip and generations. For a quick disambiguation:
- When an Emperor dies and you choose the next Emperor, it's just a Reincarnation. There is no passage of time (nor a "skip" in "generations").
- A Time Jump may only happens when a "black screen" event occurs, and on those occasions how much time has passed (number of years) depends on your generational battle count.
- Properly, Generations are a time marker that concerns (and that is displayed by) NPCs, and most obviously Hiraga in Somon. They only change as a Time Jump occurs (1 NPC generation = about 32 years). They also impact some events and their branching.
Read carefully the following sections for more info about all this.
4.1. TIME SKIP


4.1.1. Occurence Conditions
A Time Skip is the occurence of a black screen after completing certain quests, that tells you that many years have passed.
A Time Skip (aka Generation Skip or Jump) happens:
1) forcibly after defeating 5 of the Seven Heroes. Note that for Dantarg, Subier and Noel you have to talk respectively to the Mu-Calf Child, the Diver and the Desert Guard, to complete the quest and make the Time Skip occur.
2) possibly after completing certain quests that trigger a black screen with explanatory text:
Each time you complete a quest, you earn Event Points (EP, see the table below).
A Time Skip will occur:
- if your EP Total ≥ 15.
- if your EP Total = 8∼14 and if your generational battle count ≥ 240.
- if your EP Total = 8∼14 and if your EP Total before the event ≥ the remainder of [your battle count this generation ÷ 16].
And when it occurs, your EP Total is reset to 0.
E.g. Your EP Total = 6. You have cleared the Canal Fortress (+ 8 EP). New EP Total = 14. Generational Battle Count = 83. 83/16 = 5 with a remainder of 3. EP before the event (6) ≥ 3, so a Generation Skip will happen after clearing the Canal Fortress.
Notes about Battle-Counting:
- The Generational Battle Count (GBC) records the number of battles started since the beginning of the current Time Skip (Max=255). It is hidden and it is separate from your total Battle Count (which records your total number of battles since game start and can be checked in the Remaster edition in Avalon Castle 2F, bottom-right NPC). When you start anew after a Time Jump (GBC=0) and complete an Event with a GBC < 10, your GBC is forcibly set to 10 (and as many battles are added to your BC?, visible in the Remaster).
- When a Time Jump occurs, 1/4 of the number of years skipped (rounded down) is added to your total BC (your BC goes up without you actually battling).
- In the Maze of Memory, battles with enemies below your level count towards your GBC but not towards your BC.
- Quite obviously, Gerard succeeding to Leon does not mark a Time Skip, nor does Gerard defeating Kzinssie.
In the following table are found the EP values for each quest, and notably the events that trigger a black screen (in grey):
| Event | EP |
|---|---|
| Clear Canal Fortress | 8 |
| Clear Gemstone Mine (1) | 4 |
| Talk to leader in Mu Tundra after clearing South Oubliette | 1 |
| Find the Child & Mu Calf | 1 |
| Defeat Subier | 8 |
| Solve the situation with the Armed Merchants and annex North Longit | 4 |
| Banish Garon | 1 |
| Mermaid Love | 15 |
| Clear the Sunken Ship and talk to Diver in Toba | 1 |
| Defeat Cyfreet | 8 |
| Defeat Bokhorn | 8 |
| Clear Teretuva of monsters | 4 |
| Annex Savannah | 1 |
| Annex Comroon | 1 |
| Defeat Rocbouquet | 8 |
| Defeat Wagnas | 8 |
| Exit the Sealed Cave | 1 |
| Clear the Watchman Nest | 1 |
| Leon dies | 1 |
| Repel the Goblins' attack | 1 |
| Defeat the Goblin King | 1 |
| Conquer North Varennes | 1 |
| Defeat Deep One in Avalon Sewers | 1 |
| Defeat Gel Matter in Fiends' Cloister | 1 |
| Defeat the Fiends' Cloister Boss | 1 |
| Battle 'The Dragon' | 1 |
| Clear Gemstone Mine (2) | 0 |
| Defeat the East Oubliette Boss | 1 |
| Defeat the South Oubliette Boss | 4 |
| Defeat Dantarg | 8 |
| Defeat Bardic Grotto boss | 1 |
| Defeat Garon's Human guard | 4 |
| Defeat Garon | 4 |
| Defeat Subier | 8 |
| Defeat Noel | 4 |
| Defeat the Termite Queen | 3 |
| Prevent Mt Comroon eruption | 3 |
| Destroy the Stone atop Mt Comroon | 3 |
4.1.2. How far into the Future Past?
How many years are skipped depend on your Generational Battle Count (GBC), like so:
GBC/16 --> if quotient < 3, then new quotient = 3 --> Quotient x16 + remainder = years skipped.
E.g. Battle Count this generation = 75. 75/16 = 4 > 3, no change --> Years passed = GBC = 75 years.
E.g. GBC = 18. 18/16 = 1 (<3 --> becomes 3), remainder 2 --> Years passed = 3*16 +2 = 50 years.
In a nutshell:
| GBC | Years Passed |
|---|---|
| 0-10 | 58 |
| 11-15 | Battles +48 |
| 16-31 | Battles +32 |
| 32-47 | Battles +16 |
| 48-250 | Battles |
| 251+ | 250 |
How many years have passed in the Time Jump will decide how many generations have passed for a few special NPCs and a few places too.
Generations passed = Years Passed / 32 (rounded down)
This concerns:
- Hiraga, who serves as a landmark: the game starts with Hiraga III. Hiraga XI makes the Windmaker; Hiraga XVIII, Coppelia.
- the town of Miramar, which grows as generations pass since the fall of the Canal Fortress (generation 0). Also, 2 generations after the founding of Miramar, +200G revenue for you; 4, +200 again; 6, +200 again and Leon Bridge can be built.
- the Gemstone Mine: 8 generations after clearing it, the Demon Stone problem occurs.
- the Mole Village grows as generations pass after you defeat the Termite Queen (full size 4 generations later).
- the Messina Mine: monster invasion progresses as generations pass.
- the Garon Event occurs 5 generations after resolving the Armed Merchant situation, or 10 gens after the fall of the Canal Fortress.
- the Sunken Ship: if 16 generations have passed since the Garon Event, Subier is waiting for you at the end of the Sunken Ship instead of only Garon's Ghost.
- the Dungeons in Nazelle: see the dedicated section.
- Mt. Comroon erupts 5 generations after the Seer's Citadel is accessible on the Regional Map.
- Lastly, Thomas too has successors (Gen 1 when Cumberland is annexed to the Empire).
Also, 1 year passes when defeating Kzinssie1 with Gerard, after the completion of the Magic Research Facility, the Imperial University, the New City and the Leon Bridge, when Comroon erupts, when Coppelia becomes Empress, after defeating Subier in the Sunken Ship, and after you defeat Noel or Dantarg if no Generation Skip has occured. 1 year also passes when you complete any Black Screen event and no Time Skip has occured (+2 years if Last Emperor).
Note: In a nutshell, during one playthrough the number of Time Jumps will range from 0 (Early Final Emperor Run) to 12 to reach over 4000 years (4000(+)-Year Run), which is about 93 generations.
4.1.3. After a Time Skip: A New Generation
As Time Skip happened and a new Generation begins for you:
- All techs you sparked during the previous generation are now available for all to equip in the Dojo (the 3 training instructors, Avalon Castle, 1F, top-right). See the Techs page.
- All workshop items researched during the previous generation are now available in the shops. See the Workshop & Shops section.
- All Fusion Magics researched during the previous generation are now available. See the Magic section.
- All previously equipped items have been moved to your warehouse (Avalon 2F, top-right).
- After a Time Skip, there are also new characters available in each recruitable class (they are the next character in each class characters table: see the Characters section). You will have to form a new party. Every time you will also have to re-equip your recruits with items, techs and spells (tedious but unavoidable..).
- Also, when a Time Jump occurs, one fourth of the number of years skipped (rounded down) is added to your total BC.
- With each new generation, a Reincarnation also occurs.
4.2. REINCARNATION

Reincarnation can actually happen in three cases and two ways:
Naturally:
- If a Generation / Time Skip happens, a Reincarnation occurs and you have to choose your successor among 4 candidates, partly randomly selected among available characters (succession details here).
Or forcefully:
- If your Emperor's LP drop to 0 (dies), you have to choose one of the remaining members of your party as the new Emperor and will continue in the same generation.
- If your party is wiped out in battle, you have to choose your successor among 4 partly randomly selected candidates (in details here) and will continue in the same generation.
Concretely for your Emperor: the higher HP, SP & MP will be inherited; the previous Emperor's skills (techs) and spells will carry over. Skill LVs will depend on your previous LVs and your next Emperor's Class.
By talking to the Formation officer (Avalon Castle 1F top-right) you may gain a new formation depending on your Emperor's Class. See the Formation section for details. Note that it may be efficient to induce Reincarnations (i.e. to LP-kill your Emperor with specific recruits in your party) just to have access to more formations.
Notes:
- When your Emperor dies, the successor's techs are overwritten with those of the previous Emperor and the successor loses those that they might have sparked previously, which won't be available in the Dojo until the next generation.
- Each character can only become Emperor once! And once you have made Emperor all the characters at your disposal at a given time, the next one will be automatically the Last Emperor.
5. ADVANCED SECTION
5.1. MONEY MANAGEMENT
5.1.1. INCOME
It is important to secure an income for your growing Empire.
In RS2, money is earned either by engaging enemies in battle (imperial revenue) or by finding lump sums in dungeons (chests).
Note that your treasury can hold at most 16,777,215 aurum (SFC/Re).
Here are the locations of chests with money:
Sealed Cave: 100,000
Somon (Kzinssie's Mansion): 470,000
Goblin Hideaway: 100,000
Avalon (Thief's bedroom): 100,000
Canal Fortress: 380,000
Fiend's Cloister: 90,000
Fort Cyfreet: 320,000
Gemstone Mine: 850,000 + 300,000
South Oubliette: 260,000
Child & Mu Calf: 200,000
Bardic Grotto: 430,000
Gelid Ruins: 600,000
Messina Mines: 100,000
Seer's Citadel: 400,000
Emerged Island: 200,000
Sunken Tower: 400,000
Landship: 530,000
Termite Den: 150,000
Castle chonto: 150,000
Hakuro Castle: 400,000
Floating Castle: 390,000
Iris Village: 200,000
Loes Ruins: 200,000
Avalon (White Termite Den): 250,000
Sealed Cave (2): 250,000
[Re] Maze of Memory: randomly from respawning chests: 100,000∼600,000
Your revenue increases as certain quests are completed and regions annexed to the Empire.
Every time you battle you earn that amount (win or flee).
Note that certain events cripple your income (in red).
Starting Revenue: 4000
- Build Magic Research Center: +200
- Build University: +200
- Avalon New Town: +1000
- Clear Watchman Nest: +400
- During Goblin Invasion: -1000
- Clear Goblin Hideaway: +1400
- Defeat Kzinssie: +1000
- Dragon Nest: +600 or +800
- Defeat Canal Fortress Boss: +400
- Miramar: +200 at generation +2, +4, +6 since founding
- Build Leon Bridge: +600
- Clear Gemstone Mine: +2800
- During Demon Stone Event: -2800
- Clear East Oubliette, Saigo Village: +400
- Clear South Oubliette, Mu Tundra: +400
- Mobelm/Nuono, Armed Merchants: +600 or +1200 or +1800
- During Garon Event: Revenue÷2
- Defeat Garon: +1,000
- Clear Sunken Ship, talk to Diver: +2600
- Defeat Cyfreet: 3,200
- Hofah, open sea route to Tsukijima: +200
- Defeat Bokhohn in his Landship: +1800
- Clear the middle Tower in Teretuva,
or Negociate with or Defeat Noel at the Wandering Lake, talk to Desert Guard: +800
- Defeat the Termite Queen, talk to Hunter: +600
- Stop Mt. Comroon's eruption: +1000
- Defeat the Stone: +400
or Mt. Comroon erupts: -1000
- Defeat Rocbouquet in Salamat: +1400
- Defeat Wagnas in Jauda: +3600
The Orchard (Remaster only) will complement your regular income nicely. Income from the Orchard is added to your imperial revenue.


After the introductory events, you can build the Orchard (300kG), which will provide additional income.
It will take 15 battles (or 1 generation skip) to complete and it will be found at the S-W exit of Avalon town.
You will be able to upgrade it twice, after a set number intermediate levels and battles (sit on the throne to upgrade; if it doesn't work, battle some more then come back).
You must talk to the old man for intermediary levels (and corresponding incomes raise) to happen (the size of the tree or the number of trees increases, depending on your console/device): be sure to go there often to reap what you sowed, literally!
If you want to know which stage you are at, just talk to the old man: he will tell you how much revenue the orchard generates.
See it grow in the Trivia section!


Orchard LV 1: 300kG
Upgrades possible after:
1) 15 battles: 2000G revenue
2) 30 battles: 2200G revenue
3) 30 battles: 2400G revenue
4) 30 battles: 2600G revenue
Orchard LV 2: 500kG
Upgrades possible after:
1) 15 battles: 4000G revenue
2) 60 battles: 4400G revenue
3) 60 battles: 4800G revenue
4) 120 battles: 5200G revenue
5) 120 battles: 5600G revenue
Orchard LV 3: 1mG
Upgrades possible after:
1) 15 battles: 8000G revenue
2) 120 battles: 8600G revenue
3) 120 battles: 9200G revenue
4) 120 battles: 9800G revenue
5) 120 battles: 10,400G revenue
6) 120 battles: 11,000G revenue
7) 120 battles: 11,600G revenue
8) 120 battles: 12,200G revenue
9) 120 battles: 12,800G revenue
5.1.2. EXPENDITURE
Why would you need all that money for?
Managing an Empire and keeping up with the latest fashion, weaponry and magic is costly.
Here is all your possible imperial expenditure:
Throne Events:
- Magic Research Facility: 1m
- Imperial University: 2m
- Imperial Guard: 300k
- New City: 3m
- [Remaster: Orchard: 1.8m]
Weapon R&D:
- 400k x6 = 2.4m
- 800k x5 = 4m
- 1.2m x7 = 8.4m
Armor R&D:
- 400k x8 = 3.2m
- 800k x8 = 6.4m
- 1.2m x6 = 7.2m
Fusion Spell Research:
- Magic Research Facility: 500k x16 = 8m
- Alt: Umbrology Facility: 500k x8 = 4m
Varia:
- Alt: Sneak in Canal Fortress by Boat: 10k x2
- Leon Bridge: 1m
- Mermaid Potion: 10k x2
Total = 46.92m [Remaster: 48.72m]
(+ 4m for Dark Fusion Spells)
Note that for the small purchases (up to 10k), you can fill your wallet in shops that won't take your money.
5.2. HEALING
There are several ways to restore HP: thanks to items, techs / spells, or HP regen.
There are only 2 items that allow HP recovery in battle, Balm (+100HP) and Quality Balm (+400HP), which must be equipped in a hand slot prior to battle. See the Items section for details.
Various techs and spells allow HP recovery.
The HP Recovery Formula is:
HP Recovery = [Target MaxHP ÷8] + Pwr x (C + MAG + (RGN mod MAG) + 1)
Max HP recovery = 999.
If MAG = 0 then the whole part in italics = 0.
| Name | Cost | Pwr | C LV | Special |
|---|---|---|---|---|
| Fire Dragon Flood | 6 SP | 1 | Short Sw | Party Heal + Stats up + Silence. |
| Berserk | 8 SP | 2 | MA | Self. Silence, STR SPD CON up. |
| Ki Meditation | 0 SP | 3 | MA | Self. |
| Life Water | 1 MP | 4 | HY | HY LV9: cures Sleep. HY LV20: cures Paralysis. |
| Moonlight | 4 MP | 5 | COS | COS LV 9: cures Blind. |
| Earth Heal | 5 MP | 6 | TE | - |
| Shatter Staff | 1 SP | 10 | Mace | Sage Rod, Liberty Staff. Heal Party. Staff breaks. |
| Elixir | 8 MP | 64 | (HY+TE)÷2 | Restores HP and cures all status ailments except Stun & Petrification. |
See the Tech section and the Magic section for details.
Hp can also be recovered thanks to HP regeneration at the end of each turn.
HP regen
= MaxHP/10 if STA ≥ 16
= MaxHP/16 if 8 < STA < 15
= 0 if STA ≤ 8.
This ability is limited to a few classes of characters, under the condition of a corresponding magic environment: Salamander's HP regenerate in Fire environment, Nereid in Water, Mole in Earth, Iris in Wind.
Note that enemies too regenerate in the appropriate magic environment:
|
- Fire Spirit: Fire - Water Spirit: Water - Earth Spirit: Earth - Wind Spirit: Wind |
- Demon: Dark - Undead/Skeleton: Dark - Boss: Dark - No Race: Any |
Remaster Only: A few new items allow HP regen in the corresponding environment: Flame Ring, Water Ring, Wind Ring, Earth Ring. All can be found in the Maze of Memory. See the Items section and Maze of Memory Walkthrough section for details.
5.3 THE INVISIBLE STATUS
The Invisibility Status is a largely beneficial status caused by the Water spell Mist Cover or the Lady Hawk axe built-in tech Feather Seal (self only).
It has several effects:
- It makes the invisible character untargetable by foe or friend (except by yourself)
- It allows the invisible character to evade all the attacks that can be evaded.
- When taking an offensive action, the enemy target's evasion rate, as well as shields and guards, are completely bypassed and disregarded.
- After taking an offensive action, the Invisibility status is cancelled.
An Invisible character cannot be targeted by allies either, and thus cannot be healed or cured by anyone but themselves. During the Last Battle, Astral Gate will attempt to heavily Confuse one character and make them Invisible (= you cannot dispel the LV3 Confusion), which is quite problematic!
The Invisible status is cancelled when you take an offensive action, with two notable exceptions: Firewall and Light Wall (that are only accessorily offensive spells). Healing and buffing do not affect your character's invisibility.
The Invisible status can be used to learn the Evade tech corresponding to attacks that need no targeting (hit-all techs), such as Grand Slam, Empty Blade, Haphazard Arrow, Temptation, Hypnotize, Terror Voice: just make everyone invisible and wait. Of course, it can also happen that on the turn you become invisible an attack targets your character who manages to spark the Evade, but this is pure coincidence and luck.
Invisibility can also help to learn regular Evade skills: make everyone invisible except the character who, properly prepared (high def against the attributes of the attack you want to see through), will be the sole target and eventually learn the Evade skill.
When an Invisible character casts Phantom Chivalry, the phantom double also benefits from invisibility, and when the double is dispelled the original character regains their Invisible status.
The fact that the enemy's evasion rate is completely bypassed allows a much higher success rate for attacks that inflict a Status ailment as their main effect, such as Trip, Feint, Entangle, *Halt, Dimensional Break, *Dance of Death, *Execution Arrows.. as long as the targets have no immunity.
Hit-all Insta-death techs while invisible are particularly efficient to dispose of large groups of enemies (e.g. for quick TP farming).
Note that Misses still happen due to the character's attack failing the accuracy roll, so prefer techs with higher accuracy (Dance of Death > *Execution Arrows > Dimensional Break).
See the Techs section and Magic section for details about the attacks, and both this section and this section for success rates and factors.


Invisibility can be used for an entirely different purpose: to kill off a character you want to remove from your party, or murder your Emperor so as to enthrone one of your other party members. In battle, just make all your characters invisible except the unlucky one, heal when down, repeat until LP-killed. Note that if you care about only one character, you can bring down the LP of all characters not equipped with the Darkstone Ring by spending several nights in a random Inn before going into battle (Remaster NG+: you can have several Darkstone Rings).
5.4 INITAL HP
A character's Initial HP (upon joining) depends on your Battle Count and the character's STA, and will vary between a minimal and a maximal value calculated like so:
MinHP = BaseValue + (STA - 10) x GrowthValue
MaxHP = BaseValue + (STA - 10) x (GrowthValue + 1)
where the variables are:
|
|
5.5. HP, LV & MLV GAIN
The Technical Points (TP) you earn after each battle allow HP, Skill/Magic LVs and MasterLVs (MLV) to go up.
The following tables indicate how many TP are needed to level up.
E.g. If upon joining a character has 83 HP (HP Now), then 200 TP are needed for HP to rise.
HP raise is determined by STA and a RGN following this formula:
HP raise = (STA/2 + 0.5) + (RGN mod STA)/2, rounded down.
E.g. if STA=10, HP rise = between 5 and 10 HP.
For Weapon/Magic LVs and MLV, it shows the necessary additional TP to reach that LV.
E.g. to reach LV 1 you need 60 TP;
to go from LV 7 to 8, you need an additional 565 TP.
Note: Keep in mind that when a level-up occurs, excess TP does not overflow and goes to waste (one specific variable can only gain one level at most per battle).
|
|
|
5.5. STRATEGIES AND TACTICS
5.5.1. DEVELOPMENT STRATEGIES
Possibly aim to complete the Throne Events early. All are very useful.
Up to you to spend time and money (i.e. battles) on the Workshop and Spell Research when you see fit. Nevertheless, it MUST be done before the Final Emperor, at which stage there is no more Time Jump (= impossible for Workshop items to be available in shops) but spell researches complete with a Black Screen event.
See also the Money Management section.
5.5.2. STORY BRANCHING
The main Cornelian Dilemma is: Salamanders or Dark Magic?
Will you let the volcano in Comroon erupt or will you prevent it? Preventing the eruption saves the Salamanders, whom you can then recruit; letting the eruption occur kills most of the Salamanders, makes the Emerged Island appear, and you can possibly learn Dark Magic (Umbrology).
The Salamanders are, very simply, great recruits.
Umbrology and its related Fusion Spells are a fine addition to your magic arsenal (especially on the Remaster since the new Diviner class is tailored for it) but it requires some grinding (to unlock spells & research). E.g.: Shadow Servant, particularly, doubles all skill/spell dmg and is a magic shield that wards agains one physical attack; poison (Poisonous Blow, Ill Storm) can be very effective; Wraith Form can make you virtually invincible (see the Trivia section).
But all in all, the benefits of Salamanders are more straightforward and immediate, and it is indeed the no-brainer solution (if you intend to recruit them at all, that is). I'd recommend Dark Magic for a strong 'flavor' (as Kawazu puts it), interesting gameplay variations and increased replay value, or to unleash the full potential of Diviners (Remaster only).
5.5.3. BATTLE STRATEGIES
How you handle battles can be based on the leveling system.
Reminder:
You gain Technical Points (XP, really) at the end of each battle. That amount depends on which monster(s) you defeated during the battle.
But these Tech Points actually contribute to two different leveling systems: Individual LVs and Master (aka Global) LVs. As in other SaGa games, only the Skills used in battle will benefit from the battle (if one character used a sword in battle, Sword/Greatsword Skill LV will go up; if one used a shortsword and a Cosmology spell, Spear/Shortsword LV and Cosmology LV will go up ; etc.).
For each character (Individual LVs), the Tech Point gain will be divided between all the different skills used, with a small extra bonus if one has been used more than once, and depending on the tech/spell used. So basically, if one character used Sword only, the Sword Skill gets the full Tech Point gain; if one character used a sword, a mace, a punch, a Fire spell and a Earth spell, each of the corresponding Skill LVs will gain the Tech Point gain divided by 5 (approximately).
On the other hand, the Master LVs (MLVs, the hidden, general parameters that determine your characters' starting Skill LVs) will get the full amount for each character's count, e.g. if during the battle two characters used a sword, three used a Cosmology spell, two used a bow, two used a mace, one used a fire spell, then the Sword MLV will get the full Tech Point amount x2, the Cosmology MLV the full Tech Point amount x3, Bow MLV x2, Mace/Axe MLV x2, Pyrology MLV x1.
From which you can infer that in order for your next party or characters to become as strong as possible, you need to use as many different types of weapons and spells as possible during every single battle. And focus, if any, should probably be put on Cosmology, since the spell Sword Barrier is a game-changer against many bosses.
The drawback of this, is evidently that the individual LVs (the Skill LVs of your current characters) will rise more slowly, but as the game does not focus on one party, but on many parties over many generations, it should be clear on which to focus.
This also means that, during long generations (the time between two Time Jumps), it may even be beneficial to wipe your party on purpose: chances are that your new party members will be more powerful than the previous ones.
Therefore also, when there is no more 'next party' (= you have reached the Final Emperor), after raising a bit your characters' Skills that start at zero (in order to raise your MaxSP/MP, see formulae here), you should focus on Individual LVs and use as few different techs/spells as possible during each battle, and focus on what each of your character is good at, to make you current and last party as strong as possible for the final confrontation.
Some argue that endgame battles net you several thousands of Tech Points every time, so there is no need to bother raising your MLVs early on.
This is irrelevant, since the points of raising your MLVs are: early stronger characters upon recruitment, incidentally increased pools of SPs/MPs for your current party, and earlier access to key spells. And all this with the same battle count (no grinding). As said above, for endgame mob battles, you'll then be free to focus on grooming your final party's particular skills.
The enemies' rank scales with your Battle Count (= number of battles started).
Stronger enemies are worth more Technical Points.
Hence, if you know what you're doing, since early enemies are worth very little Tech Points, it is possible to flee from many battles from the start to artificially increase your battle count and thus the enemies' level (and thus the Tech Point gain per battle). It is a huge time gain, but be careful not to be overwhelmed by enemies you wouldn't be able to handle.
5.5.4. BATTLE TACTICS
The usefulness of Status Ailments should never be underestimated, especially:
- Blind with the cheap Cosmology Lightball spell, to reduce the accuracy of enemies' attacks. Cast with several fast characters at the start of every mob battle.
- Stun with fast character (best success rates = Daze, Feint, Stun Slash). During critical battles (Guardian, Queen, etc.), have several fast characters try to Stun the target at every turn. For mob battles, Terrology Entangle spell (mass Stun) can be helpful.
- Paralysis: Quarterstaff's Halt can be very useful against mobs. For individual enemies (in order of success rate): Paralyze, Blunt Strike, Stunner.
Note that making your character Invisible before performing the effect-inflicting attack raises your chances to succeed.
A few techs also attempt to apply Status Ailments as a side-effect: see this Note in the Tech Section.
5.5.5. NATURAL DEATH VS. SAVE RELOAD
In RS2, party wipe or MC death is part of the game process, thanks to the mechanics of reincarnation and time jumping: possibly when you complete an important event ('black screen' event), or when your party gets defeated, or when your Emperor perma-dies, the Empire lives on: you get to choose a new Ruler and all recruitable characters are now stronger than before (thanks to Master Levels).
This goes against all your RPG reflexes: in a traditional RPG, when you die, you reload your latest savestate, i.e. you go back in time, you do as if you hadn't been defeated, in order to try again, or to level up more or to equip different items before doing so. This makes sense in traditional RPGs because, well, when you die, it's Game Over - and unless you are a hardcore player, few would want to start the game anew every time this happens.
But not here! because even when your party gets decimated, the game continues.
Of course, some ongoing events 'continue' also when you die (or time-jump) and some won't wait for you, but for most events your death is inconsequential, either because it really doesn't matter and it has no impact, or because alternate paths exist.
In conclusion, unless you plan to play the game only once because you have too many games on your playlist, or unless you are a modern self-proclaimed OCD perfectionist that need to plans their playthrough down to the last dot in order to 100% platinium in one run, you should probably go with the flow and learn from your mistakes, like all clever Avalon Emperors and Empresses, and enjoy RS2's genius gameplay concept and its amazing replay value.
5.6. SPECIAL PLAYTHROUGHS
5.6.1. EARLIEST FINAL EMPEROR
For the Early Final Emperor basics, see the Trivia section.
As the name suggests, an Earliest Final Emperor consists in making the Last Emperor appear ASAP. Here are two complete runs!
All in all it has a much easier start than a regular run (great starting equipment) and it is calmer too (no Time Jump = no rush, no need to worry about not being able to complete a quest if you go do something else midway through, etc.); but a good number of quests are unavailable (see the Trivia section) and changing party members purposefully is a bane!
If you are lost at some point, please refer to the Walkthrough.
If you have troubles with some enemies, see the Bosses section.
Final Male or Female? Up to you! The Emperor has the better stats. The Female's weapon has a very convenient Hit-All attack to clear mobs quickly and a fine healing spell, and it can use Sword techs too. The Male possibly allows a quicker annexion of Salamat. The Female cannot start the Mermaid Quest. Both have the same relatively inadequate Type to spark top Greatsword Skills (if you want to use Moonlite and develop your Sword Skills, use the Knee Split / Double Cut you inherited from Leon and build from there: see the Tech Spark Trees).
RUN 1 (MALE)
Play the game normally until you battle Kzinssie and he Soulsteals Leon.
After Leon dies, un-equip your party and go wipe against the Goblins that have invaded Avalon. Then kill all your successors without ado (no need to un-equip: just zap out of the castle and run south to the enemy, attack, die; for Heavy Infantry, who might survive thanks to their shield, attack with Daze for example). This is rather fast (you have only 1+7*8 = 57 Emperors to kill, all in all).


When your Final Ruler appears (you have to select them twice), check your Warehouse to contemplate the spoils of your murdering (suicide) spree and discover one extra set of the Final Ruler's equipment: very nice. In Avalon, you can also grab the kids' gifts.
Depending on whether you got early Fire and on the order you recruited and killed your Emperors, your Final Ruler will have various sets of skills and of magics.
Note: Party members.
Up to you. It is possible to shape the dream team of your favorite classes (pick the characters with the best Types and best stats; they will stay with you till the end unless they LP-die, but you can re-recruit them again). Or you can play with the original characters of each class. Personally, for this walkthrough, I stuck with a near-original crew of Bison, Hector, Aries, Magellan (I suicided Henrique before deciding it was too much hassle to bother, haha).
Note: Formations.
You guessed it: you only have two formations at your disposal! Free Fight is faster.
Note: the Dojo.
There won't be a Dojo until much later but Skill Recording still works as usual behind the scene (i.e. after killing a Hero), which means that you need to be a bit careful, as if two characters use the same weapon, one may end up with sub-par techs (if one character spark techs and you kill a Hero, no other character will be able to spark these techs).
Note: Skills.
Until the Dojo is operational, be selective and keep what you need to spark strong techs later.
Sword: Knee Split then Whirlwind, Mach Blade. | Greatsword: Flowing Slash, Empty Blade.
Axe: Tomahawk, Time Lapse. | Club: Bonecrusher (or Twinstrike).
Spear: Aim, Double Stab, Charge. | Short Sword: Sidewinder.
Bow: Quick Arrow. | Martial Arts: Kick then Sobat, Ki Blast, Dual Gunner.
Keep some space for some Evade Techs.
Exceptions for a few techs that inflict useful Status Ailments.
After you defeat the goblins, you can recruit Mercenaries.
Defeat Kzinssie to start conquering the world.
Throne Event: Magic Research Facility.
N & S Varennes: Canal Fortress.
City Thief route.
Deep One (TechLV 19): battle, learn skills, flee, repeat. Petrified Rush, which the Last Emperor can spark (from Aiming), can be useful, and skills that induce Paralysis for example (Shock Rush, Stunner..). Personally I also like to have Ki Meditation on most party members (until they can learn magic).
Since you have at least 2 party members with great items, you can net a LOT of TP and LVs with Battles at the Gate (the amount doesn't show when over 9999TP). Sparking the relevant Evade Skills (especially Haphazard Arrow) considerably eases it.


Now you can head East (Cumberland or Steppe etc.) or roam South (Ludon / Nazelle / Frozen Sea, or Longit N/S and from there Melu etc.).
North Longit: Armed Merchant Problem.
Take the ship in Mobelm by force, find your way in the Waterway Maze and subdue the pirates (you *must* do so to get Poet's Bassoon later, to reach Iris and Wagnas since you cannot have the Windmaker).


South Longit.
Open the way to Melu. Possibly leave your chat with the Diver for endgame.
Remember NOT to complete the Mermaid quest (otherwise: Game Over) but feel free to start it.
South Varennes.
Let Karl kill the Fiends' Cloister boss to be able to recruit Brawlers.
Ludon. Gemstone Mine. Don't forget to come back for the rest of the gems.
Nazelle & Frozen Sea.
Nothing special until you open Child & Mu Calf: up to you to go kill Dantarg now or later.
Throne Event: University.
Cumberland.
Complete in any way you like.
If you had forgotten (or didn't know) what the trigger of the Fall of Cumberland was.
The Sea Route to Comroon cannot be opened.
Melu.
Clear the central Tower in Teretuva, or one of the other towers and negotiate with Noel in the Wandering Lake for the annexion money now and a battle later (endgame).
Salamat.
Ruffle Tree (TechLV 31) for Sparking.
Kill Rocbouquet in Teretuva Tower after learning the Temptation Ward (the easiest way to do so: make all your characters invisible but one immune to it and adequately armored for this battle).
Eirunep Shrine (Guardian) and the Sunken Tower are optional.
Comroon.
Plug the volcano.
Cannot recruit Salamanders (no Time Jump).
Throne Event: Imperial Guard.
Steppe.
Strategist route (not to have to re-equip, fewer battles too) to kill Bokhohn.
Savannah.
Defeat the Queen to be able to start the Moonlight Comb quest (to be able to recruit Nereids eventually, if you wish).
Cannot recruit Moles (no Time Jump).
Careful: if you talk to the Hunter to annex the Savannah, you'll trigger the Real Queen quest. But with this you can also start the Poet's Instruments quest, necessary to reach Wagnas. (With this you can also battle the Pyrohydra for the egg.)
Avalon.
Termite Battlers are TechLV 37 (and worth 1294 TP each): one of the only enemies against which you will be able spark top skills if you have a low BC.
After beating the Real Queen, the Dojo appears at last. Recorded inside, the techs sparked since the last time you defeated a Hero (as expected). The most important for what's to come eventually is evidently access to your Soulsteal and Temptation Evades for all.


Jauda.
You can advance until Hakuro Castle grows wings.
Time for a compulsory World Tour to gather the Poet's Instruments.
Then up the mountain to the Iris Village, and to defeat Wagnas.


Tying Up Loose Ends:
Nazelle: Dantarg. (Incidentally, an Earliest Last Emperor run is the easiest way to meet Dantarg1.)
Throne Event: New City. You should have plenty of money even if you have a very low BC unless you have done a lot of R&D.
Melu: Angry Noel in the Wandering Lake.
Torrence: Forgotten Village.
Austeros: Firn Ruins. Also for the Dragons' high TechLV (33∼39).
(Preferably leave one Hero for last so that the Dojo may record the techs possibly sparked against the Dragons.)
Frozen Sea: Subier (talk to the Diver to trigger).


Frozen Sea: Last Dungeon.
Kzinssie 2 and the Seven Heroes.
And with some effort and luck, The End! Congratulations! As you notice with the ending Imperial Chronicles, your story and reign was pretty short! A bit more than 30 years in all but how busy they were! haha.
Well, wasn't this an extremely interesting run? : D


RUN 2 (FEMALE)
To complete this Earliest Emperor section, here is a run with the Empress and an all-female party with first units only (each recruit is final). To make things a bit more interesting, I took The Long Way Round (annex Cumberland before clearing the Canal Fortress).
- Empress solo (spark: Sword): Kzinssie, (Magic Research Facility), Fiends' Cloister, Gemstone Mine, East/South Oubliettes, Teretuva central Tower, Negotiation with Noel,
- Passing through Jauda and Salamat: recruited Jeanne (spark: Axe), passing through Savannah, Steppe: Cumberland (chose Sophia, found Thomas; ofc, you can't go back to Somon by boat since the Armed Merchants still roam the Oreon Sea), (University),
- Recruited Sophia (spark: Mace), Loess Ruins & Gelid Ruins while waiting for the University to complete (sparked Whirlwind & Reverse Delta vs. Giant, yay), Steppe: Bokhohn, (considered recruiting Fatima but decided to wait for Windie), Savannah: killed Queen, started the Poet's Instruments Quest (take the Stone Boat with you), must-clear Canal Fortress at last now (Vagabond Route, don't battle too much, but grab some TP at the Gate),
- Recruited Cat (spark: Martial Arts), Real Queen, (access to Dojo, yay), Armed Merchants, Jauda: Wagnas, (Imperial Guards),
- Recruited Windie (spark: Bow), Torrence, Salamat: Rocbouquet, annexed Savannah (had not talked to Hunter to test triggers), Comroon, (New City), Frozen Sea: Subier, Austeros: Firn Ruins, Melu: Noel, Nazelle: Dantarg, Last Dungeon: Kzinssie2, 7Heroes (a very difficult battle), The End!
A few pics from this Earliest Empress Conquest!


An Early Empress' Journey:


5.6.2. NO FINAL EMPEROR
For No Final Emperor, see the Trivia section.
5.6.3. 4000+ YEARS
These are long playthroughs that maximize the Event Point (EP) gain so as to Time Jump thanks to all events that prompt you a black screen, with a total of 8 EP and 250+ battles each time, for 12 Time Skips. Requires tight planning! and LOTS of battles..
5.6.4. ALL-MAGE PARTY
Parties with magic only are quite popular.
Before anything else, check the Magic section.
Then you will have to choose adequate characters, according to their aptitudes and stats, factored by equipment, formations and techs/spells!
Helpful characters are evidently those with default Magic LVs (so as not to have to train them, but training from scratch may be worth it if you plan to keep a character for a long time, e.g. in an Early Last Emperor run) and with a high MAG and a high MAG(minus)LOG ration (see the section dedicated to spell dmg formulae) unless you want to focus on support (MAG only for healers - see the Healing section for details - but MAG or LOG do not matter if you focus on magic shields) or on Umbrology (in which case LOG matters primarily).
There are a good number of items that enhance MAG, and a few that even raise LOG. One drawback of most of the MAG-enhancing items is that their Phys DEF is quite lacking (the best item being probably Avalonian Robe). Interestingly, most of the few LOG-enhancing items provide useful immunities to status ailments (pretty cool to put the Rabbit set on the Vagabond named Rabbit, perfect for the job too! : ). Be sure to check the respective DEF, special effects and drop details in the Items section (CTRL+F the item name or "MAG+" or "Logic+" and cycle through the results).
MAG+4:
- Accessory: (Re: Magic Ring)
MAG+3:
- Body: Moonbeam Robe
MAG+2:
- Head: Magician's Cap
- Body: Stardust Robe / Sun Robe / Avalonian Robe
MAG+1:
- Head: Headband
- Body: Sorcerer's Robe / Beetle Robe
- Feet: Magician's Boots
- Accessory: Silver Ring / Cat's Eye / Starstone / Darkstone Ring / Entite Ring / Ring of Nibel / Merou Ring / Somon Ring
LOG+3
- Body: Twilight Robe | Accessory: Candy Ring
LOG+2
- Head: Rabbit Ears | Body: Rabbit Armour
LOG+1
- Accessory: Rabbit's Foot
A few techs/spells enhance MAG:
Spells:
- Dragon Pulse (HY+TE MLV15) All Stats up by [(HY+TE)/7]+2 for 1 action, self only.
Techs:
- Acuity (Sage Rod) MAG up by [BL LV/6]+2
- Blessing (Liberty Staff) STR MAG up by [BL LV/6]+2
As you can see, BL weapons proficiency should be taken into account (and properly leveled-up) if you wish to use tech buffs efficiently.
Additionnally, damage can be enhanced by:
- the adequate battle magic environment (+25%),
- Formation bonuses (+25% max),
- Shadow Servant (x2).
See the dedicated section for details.
Another capital stat for mages is probably SPD.
Only magic shields are helpful to mages (as regular shields do not activate when casting a spell), so attacking first is arguably a must (it also depends on your play style). SPD can be boosted with various formations, items and spells, but a high native SPD is always nice. A good balance between Spl Pwr & SPD is probably ideal.
Formation bonuses: see the dedicated section. Remember that the formation Rapid Stream grants First Strike at every turn, with the compensation of having all your characters Stunned after they act.
There are only a handful of items that enhance SPD, namely 3 foot gear (Re: and 1 accessory):
Rubber Soles (+1), Quicksilver (+2), Feather Boots (+4), and (Re:) Quick Ring (+4)
See the Items section for DEF, special effects and drop details.
Spells:
- Faerie Glow (COS+AE MLV 15), SPD up by [(COS+AE)÷3 +2], self only.
- Dragon Pulse (HY+TE MLV15) All Stats up by [(HY+TE)/7]+2 for 1 action (stack-able), self only.
While you're at it, have a glance at the (De)Buff section!
All that said and taken into account, the Mage Classes are:
Court Mage (M/F) - Crusader (F) - Iris - Mage for Hire (M/F) - Nereid - Strategist - (Re: Diviner)
Incidentally resilient classes shouldn't be dismissed, to be used as front-row magic-support tanks, for example, like Moles , Salamanders or even Crusaders (M).
And if you walk the Dark path on SFC (and thus do not have access to Diviners), you will have to train your Umbrologist(s). F Vagabonds Cat (UM 24 / MAG 13 / SPD 22) and Rabbit (23/13/21), Levante Guard Jubei (23/11/21), F Nomad Fatima (23/18/17), M Vagabond Starling (23/11/19), Armed Merchant Drake (22/10/22), Amazon Ekaterina (21/15/16), Diver Linda (22/18/18), Hunter Osei (21/11/14) are all good candidates.
5.6.5. NO SAVE NO DAMAGE
Ref: http://ultimagarden.net/report/zser_rs2_nosave/
This playthrough revolves around early grinding to max, Rapid Stream & Hasten Time. Until you can get those two: near-systematic Back-Attack to get initiative bonus and kill all enemies in one turn (if you can't, flee), spark Shade Arrows and Airwave ASAP, Situation Reproduction (RNG manipulation) for tough spots (Kzinssie 1st turn attack).
QUICK LINKS
No-Spoiler Tips - Game Info - Gameplay - Characters - Techs - Sparking - Magic - Items - Monsters - Bosses - Maps - Trivia & Secrets
Walkthrough: Part 1 - Part 2 - Part 3 - Part 4
COPYRIGHT / ATTRIBUTIONS
Except where noted otherwise, I am the author of all parts of this website (including all screenshots, all maps, walkthroughs, translations & adaptations). Evidently, no part of this website may be reproduced, distributed or published without my prior written consent: failing to comply is a violation of author's rights / copyright laws. With the obvious sole exception of a short quote: kindly attribute. Please respect other people's work, like you'd expect other people to respect your own. Thank you!
CONTACT
If you see a typo, an error or would like to make a suggestion, feel free to contact me: romancingsaga3fan@gmail.com
See also --> ROMANCING SAGA 3 BLOGSPOT
YOU ARE SPLENDID
This page was helpful? Feel free to show your support! It is possible via Paypal (here or directly to the e-mail address above). Thank you!